A clogged dishwasher filter is the sneaky culprit behind dishes that come out spotted, greasy, or smelling faintly of last week’s casserole. Most homeowners don’t realize their KitchenAid dishwasher has a filter that needs regular cleaning, until performance takes a nosedive. Unlike older models with self-cleaning filters (which were loud and water-hungry), modern KitchenAid dishwashers use manual filters that trap food particles efficiently but require hands-on maintenance. The good news? Cleaning the filter is a five-minute task that doesn’t require tools, plumbing know-how, or a service call. This guide walks through locating, removing, and cleaning the filter so the dishwasher keeps running like new.
Table of Contents
ToggleKey Takeaways
- Cleaning your KitchenAid dishwasher filter is a simple five-minute task that prevents spotted dishes, musty odors, and costly pump damage without requiring tools or professional help.
- The filter assembly is located at the bottom of the tub beneath the lower spray arm and consists of an upper mesh cylinder and lower flat filter that both need regular maintenance.
- Clean the filter weekly for daily dishwasher use or monthly for light use by rinsing, soaking in soapy water, gently scrubbing with a soft brush, and rinsing thoroughly—avoiding abrasive scrubbers or harsh chemicals.
- Signs your KitchenAid dishwasher filter needs immediate cleaning include dishes coming out dirty or gritty, standing water in the tub, musty smells, and slow drainage.
- Regular KitchenAid dishwasher filter cleaning prevents bacterial growth, maintains water flow, and helps the appliance run efficiently for years while avoiding expensive repairs.
Why Cleaning Your KitchenAid Dishwasher Filter Matters
The filter is the workhorse of the dishwasher’s cleaning system. It catches food debris, everything from rice grains to coffee grounds, before it can recirculate onto clean dishes or clog the drain pump. When the filter gets packed with gunk, water flow weakens, spray arms can’t spin properly, and dishes come out dirty even after a full cycle.
A dirty filter also creates a breeding ground for bacteria and mold, which causes that musty smell some dishwashers develop. Over time, a neglected filter can strain the pump motor, leading to costly repairs or shortened appliance lifespan. Regular maintenance tasks like cleaning the dishwasher filter prevent these issues before they start.
KitchenAid’s manual filter design (standard on most models since the mid-2000s) is quieter and more energy-efficient than older self-cleaning systems, but it shifts the responsibility to the user. Think of it like changing the lint trap in a dryer, skip it, and performance suffers. The filter takes seconds to access and costs nothing to maintain, making it one of the easiest ways to keep the appliance running efficiently.
Locating Your KitchenAid Dishwasher Filter
On nearly all KitchenAid dishwashers, the filter assembly sits at the bottom of the tub, directly beneath the lower spray arm. Open the dishwasher door and pull out the bottom rack completely, this gives clear access to the floor of the tub.
Look for a cylindrical or circular component in the center or back corner of the tub floor. It’s usually a two-part assembly: an upper filter (a fine mesh cylinder that twists out) and a lower flat filter (a coarse screen that lifts out after the upper filter is removed). Some models have a third component called the micro-filter, which is integrated into the upper assembly.
The upper filter typically has a tab, arrow, or textured grip area to indicate the unlocking direction, most KitchenAid models unlock with a quarter-turn counterclockwise. If the filter location or design isn’t immediately obvious, check the user manual or the KitchenAid website for model-specific diagrams. The model number is usually printed on a sticker inside the door frame along the top or side edge.
Step-by-Step: How to Remove and Clean the Filter
Removing the Filter Assembly
Safety first: Make sure the dishwasher has finished its cycle and cooled down. Hot water and steam can cause burns, and reaching into a machine mid-cycle is a shock hazard if wiring is exposed.
- Pull out the bottom rack and set it aside.
- Grasp the upper filter cylinder by the textured grip or tab.
- Twist counterclockwise (usually a quarter-turn) until it unlocks, then lift straight up and out.
- Remove the lower flat filter by lifting it gently from the tub floor. It should come out without force, if it resists, check for clips or a secondary locking tab.
- Inspect both pieces for visible debris, grease buildup, or discoloration.
Some models have a micro-filter that’s part of the upper assembly. It doesn’t separate further, so clean it as a single unit.
Cleaning the Filter Thoroughly
What you’ll need:
- Warm water
- Dish soap (liquid or gel)
- Soft-bristle brush (an old toothbrush works great)
- White vinegar (optional, for hard water deposits)
- Microfiber cloth or sponge
Step-by-step cleaning:
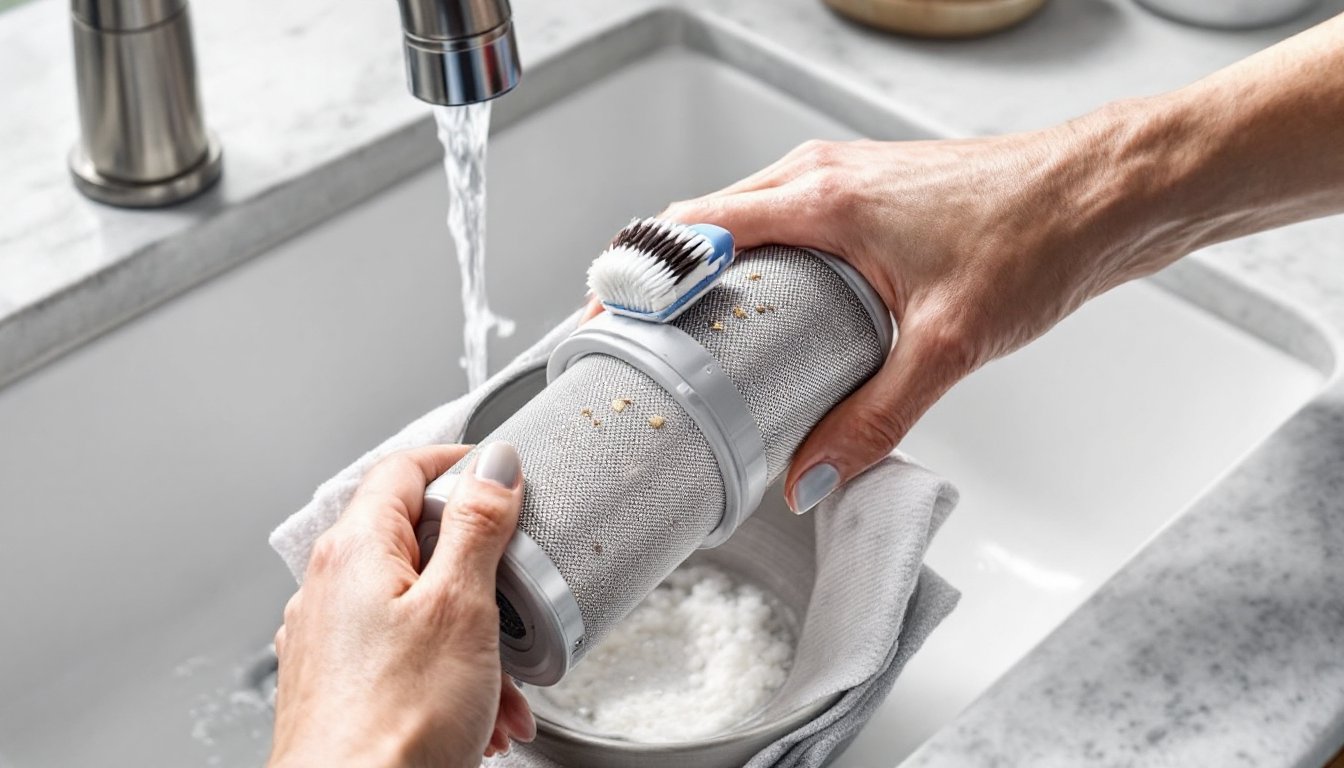
- Rinse under running water to flush away loose debris. Hold the filter at an angle under the faucet so particles wash away instead of settling back into the mesh.
- Soak in warm soapy water for 5–10 minutes if there’s caked-on grease or sticky residue. Add a tablespoon of dish soap to a basin or sink.
- Scrub the mesh gently with the soft-bristle brush, working in small circular motions. Pay extra attention to the fine mesh on the upper filter, this is where grease and mineral deposits accumulate.
- Rinse thoroughly until water runs clear and no soap residue remains. Soap left on the filter can create suds during the next cycle.
- For hard water buildup, soak the filter in a 50/50 mix of white vinegar and warm water for 15 minutes, then scrub and rinse. Vinegar dissolves mineral scale without scratching the mesh.
- Wipe down the filter housing in the dishwasher tub floor with a damp cloth. Remove any debris or sludge sitting in the well where the filter seats.
Never use abrasive scrubbers (steel wool, scouring pads) or harsh chemicals (bleach, ammonia) on the filter. These can damage the mesh or degrade the plastic housing. Avoid the dishwasher itself for cleaning the filter, ironically, the high heat and detergent can warp the fine mesh over time.
Reinstallation:
- Place the lower flat filter back into the tub floor, aligning any tabs or notches.
- Insert the upper filter cylinder and twist clockwise until it locks into place. You should feel or hear a slight click.
- Give the filter a gentle tug to confirm it’s seated securely. If it lifts out easily, it’s not locked.
- Slide the bottom rack back in and run a rinse cycle (no dishes) to check for leaks or unusual noises.
If water pools around the filter area or the dishwasher makes grinding sounds, the filter may not be seated correctly. Remove and reinstall, ensuring both the lower and upper components are aligned.
How Often Should You Clean Your Filter?
KitchenAid recommends cleaning the filter once a month under normal use, but real-world frequency depends on household habits and dishwasher usage.
Clean the filter weekly if:
- The household runs the dishwasher daily or multiple times per day.
- Plates aren’t pre-rinsed before loading (scraping is fine: rinsing isn’t necessary with modern detergents).
- Meals include starchy foods (pasta, rice, oatmeal) or greasy dishes that leave heavy residue.
Monthly cleaning works for:
- Light use (3–4 loads per week).
- Dishes that are scraped well before loading.
- Homes with soft water, which reduces mineral buildup.
Signs the filter needs immediate cleaning:
- Dishes come out with food particles or a gritty film.
- Standing water remains in the bottom of the tub after a cycle.
- The dishwasher smells musty or sour, even after running a cycle.
- Water drains slowly or not at all.
- Error codes related to drainage or water flow appear on the control panel.
Many homeowners find it easier to clean the filter on a set schedule rather than waiting for problems. Pairing it with another monthly maintenance task, such as running a dishwasher cleaning cycle with a cleaning tablet, keeps the entire appliance in top shape.
Troubleshooting Common Filter Problems
Filter won’t twist or unlock: Food debris or mineral deposits can cement the filter in place. Soak the area with warm water for a few minutes to loosen buildup, then try twisting again with steady, even pressure. Avoid using pliers or excessive force, which can crack the plastic housing.
Dishes still dirty after cleaning the filter: Check the spray arms for clogs. Remove them (they usually twist or clip off) and flush out any debris blocking the spray holes. Also verify that the dishwasher detergent is fresh, old detergent loses effectiveness, and that the water heater is set to at least 120°F for proper cleaning.
Persistent odors even with a clean filter: Buildup may be hiding in the door gasket, spray arm, or drain hose. Wipe the rubber door seal with a cloth dipped in vinegar, and run an empty cycle with a cup of white vinegar placed upright on the top rack. For stubborn smells, the drain hose may need flushing or replacement, this is a more involved repair that may require a pro.
Filter cracks or warps: Filters are made of plastic and can degrade over time, especially if exposed to harsh chemicals or extreme heat. Replacement filters are available through KitchenAid’s parts site or appliance parts retailers, typically costing $15–$40 depending on the model. Match the part number to the dishwasher’s model number for compatibility.
Standing water won’t drain: A clean filter should resolve most drainage issues, but if water still pools, the problem may be a clogged drain hose, a faulty drain pump, or a blocked garbage disposal connection (if the dishwasher drains into the disposal). Check that the disposal knockout plug was removed during installation, this is a common oversight that blocks drainage entirely. For persistent drainage problems, consult a plumber or appliance technician.
Error codes after reinstalling the filter: If the control panel displays an error related to water flow or drainage after cleaning, double-check that both filter components are locked in place and that no debris remains in the filter housing. Power-cycle the dishwasher by turning off the circuit breaker for 60 seconds, then turning it back on. This resets the control board and often clears false error codes.
For ongoing issues even though regular filter maintenance, the dishwasher may have a mechanical problem, a worn pump, faulty pressure sensor, or failing control board. At that point, it’s time to call in a qualified appliance repair technician. Routine filter cleaning prevents most problems, but it can’t fix hardware failures or installation errors. Following a home maintenance schedule for all appliances helps catch small issues before they turn into expensive repairs.