A KitchenAid dishwasher is a workhorse appliance, but even the best machines need regular cleaning to stay efficient. Over time, food debris, hard water deposits, and soap scum accumulate in filters, spray arms, and hidden corners. The result? Cloudy glassware, lingering odors, and dishes that don’t come clean. Regular maintenance prevents these issues and extends the machine’s lifespan. This guide walks through a complete deep-cleaning process using common household supplies and tools most homeowners already have. It’s a straightforward project that takes about 30 minutes and delivers noticeable results.
Table of Contents
ToggleKey Takeaways
- Regular KitchenAid dishwasher cleaning prevents clogged filters and mineral deposits that reduce water pressure and cleaning performance.
- A complete deep clean using white vinegar and baking soda takes only 30 minutes and restores proper spray arm function across all racks.
- Monthly maintenance—including a vinegar cycle and filter inspection—keeps your KitchenAid dishwasher fresh and extends its 10-13 year lifespan.
- Hard water mineral deposits on spray arm nozzles can be cleared with toothpicks and a vinegar cycle to restore even water distribution.
- Avoid bleach when cleaning KitchenAid dishwashers, as it corrodes stainless steel interiors and damages rubber seals and gaskets.
- Proper loading habits and correct detergent amounts matter as much as cleaning—scrape dishes but don’t pre-rinse, since soil sensors need something for detergent to bind with.
Why Regular Cleaning Matters for Your KitchenAid Dishwasher
KitchenAid dishwashers use high-pressure spray jets and precise water temperatures to clean dishes. When the filter clogs with food particles, water pressure drops and cleaning performance suffers. Hard water leaves mineral deposits on spray arm nozzles, reducing the spray pattern’s effectiveness.
Negligent maintenance also creates ideal conditions for mold and bacteria growth. The rubber gasket around the door traps moisture and food residue, which can develop a musty smell that transfers to clean dishes.
The filter assembly captures everything from rice grains to citrus pulp. KitchenAid recommends checking it monthly, but homes with heavy dishwasher use, or hard water, should inspect it every two weeks. A clogged filter forces the pump to work harder, shortening the motor’s lifespan and potentially voiding warranty coverage if neglect causes failure.
Spray arms accumulate calcium and lime scale in their small nozzles. When these openings clog, water can’t reach upper racks properly. Glasses stay spotty, and dried food clings to plates. Regular cleaning restores proper water distribution across all racks.
What You’ll Need to Clean Your KitchenAid Dishwasher
Gather these supplies before starting:
Cleaning Supplies:
- White vinegar (2 cups)
- Baking soda (1 cup)
- Dish soap (mild, unscented)
- Old toothbrush or small cleaning brush
- Microfiber cloths (2-3)
- Toothpicks or wooden skewers
- Spray bottle
Safety Equipment:
- Rubber gloves (to protect hands from debris and cleaning solutions)
Optional:
- Commercial dishwasher cleaner (citric acid-based products work well for heavy mineral buildup)
- Descaling solution (for homes with very hard water)
White vinegar is the primary cleaning agent here. It dissolves mineral deposits, cuts through grease, and neutralizes odors without harsh chemicals. Baking soda provides gentle abrasion for stuck-on grime and freshens the interior.
Avoid using bleach in KitchenAid dishwashers. The stainless steel interior can corrode, and bleach residue may damage the rubber seals and gaskets. If dealing with significant rust stains or discoloration, a specialized appliance cleaning routine offers better results than harsh chemicals.
Step-by-Step Deep Cleaning Process
Cleaning the Filter and Drain
Start by removing the bottom rack completely. The filter assembly sits in the dishwasher floor, typically beneath the lower spray arm.
-
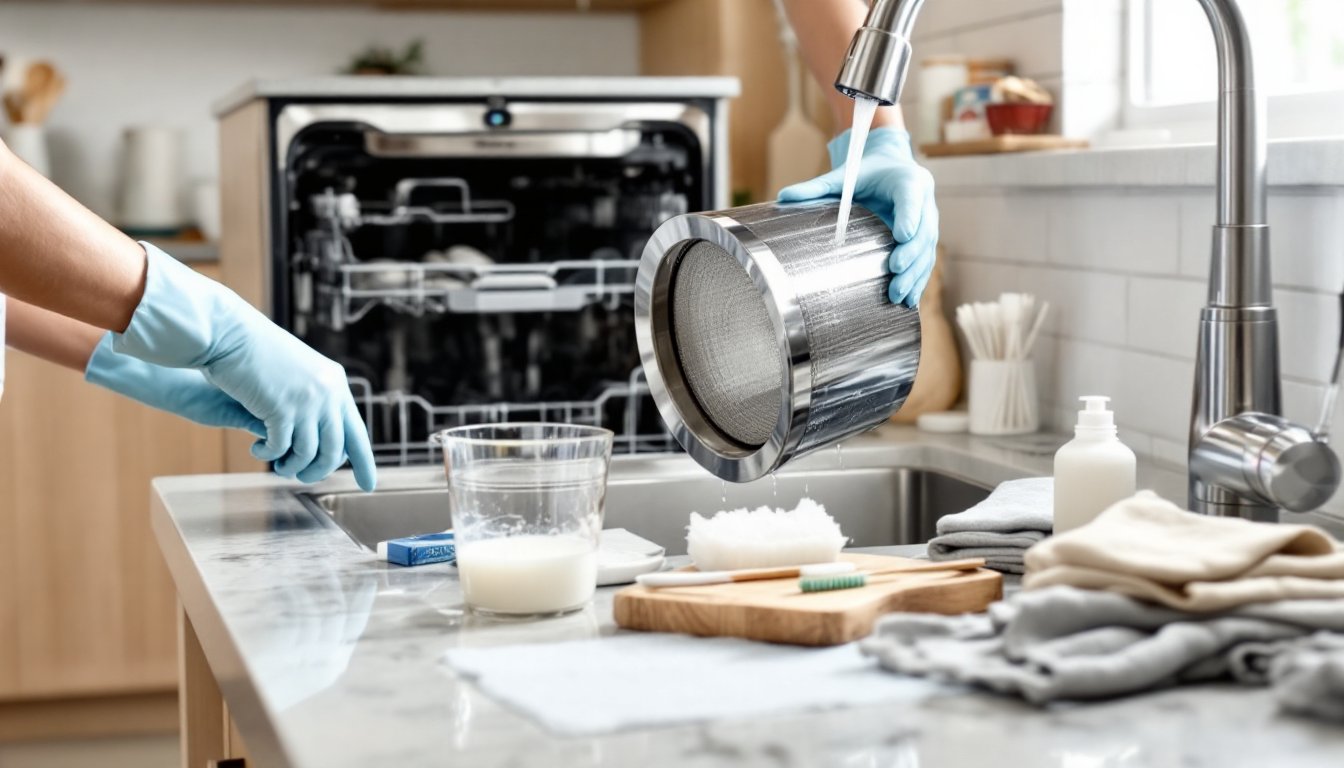
Remove the filter: Turn the cylindrical upper filter counterclockwise and lift it out. On most KitchenAid models, this reveals a flat, fine-mesh screen underneath. Lift that out as well.
-
Rinse under warm water: Hold the filter under running tap water, using your fingers to dislodge visible food particles. For stubborn residue, use the old toothbrush to scrub the mesh. Don’t skip this step, food trapped in the mesh reduces water flow significantly.
-
Soak if necessary: If the filter has dried-on grime or grease buildup, soak it in a sink filled with hot water and a tablespoon of dish soap for 15 minutes. Scrub again after soaking.
-
Check the drain opening: With the filter removed, inspect the drain hole in the dishwasher floor. Remove any visible debris, glass shards, bones, or labels can accumulate here. Wipe the area with a damp cloth.
-
Reinstall the filter: Place the fine screen back first, then insert the cylindrical filter and twist clockwise until it locks. A properly seated filter should sit flush with the dishwasher floor.
Cleaning the Spray Arms and Interior
The spray arms distribute water throughout the dishwasher. Clogged nozzles create uneven cleaning patterns.
-
Remove the spray arms: The lower arm typically lifts straight up after unscrewing a central cap. The upper arm may require removing the top rack first, consult your model’s manual if it’s not immediately obvious. Most KitchenAid models use a simple twist-lock mechanism.
-
Clear the nozzles: Hold each spray arm up to light and look through the small holes. Use toothpicks or wooden skewers to clear any clogged openings. Avoid metal tools that might scratch or enlarge the nozzles. Rinse the arms under running water.
-
Run vinegar through the empty dishwasher: Place a dishwasher-safe bowl or measuring cup filled with 2 cups of white vinegar on the top rack. Run a complete hot water cycle. The vinegar circulates through the spray arms, dissolving mineral deposits and sanitizing interior surfaces. Many kitchen maintenance experts recommend this monthly treatment for homes with hard water.
-
Sprinkle baking soda on the floor: After the vinegar cycle completes, sprinkle 1 cup of baking soda across the bottom of the dishwasher. Run a short hot water cycle (no dishes). This removes any remaining odors and brightens stainless steel surfaces.
-
Clean the door gasket: The rubber seal around the door edge traps food particles and moisture. Dip a microfiber cloth in a solution of warm water and dish soap. Wipe the entire gasket, paying attention to the folds where grime hides. Dry thoroughly with a clean cloth.
-
Wipe down the exterior and control panel: For stainless steel exteriors, wipe with the grain using a damp microfiber cloth. Dry immediately to prevent water spots. Clean the control panel gently, avoid excessive moisture near buttons and displays.
Monthly Maintenance Tips to Keep Your Dishwasher Fresh
Between deep cleans, these quick tasks prevent major buildup:
Weekly:
- Wipe the door edges and gasket with a damp cloth after the last load of the day
- Check the filter for large debris before running cycles
- Leave the door slightly ajar for 30 minutes after the final cycle to allow moisture to escape
Monthly:
- Run the vinegar cleaning cycle described above
- Inspect spray arm nozzles for clogs
- Check the drain area for accumulated debris
- Wipe down the interior walls and door with a damp cloth
Quarterly:
- Remove and thoroughly clean the entire filter assembly, even if it looks clean
- Inspect the water inlet valve screen (located where the water supply connects under the sink) for sediment, consult your manual for location and access
- Run a commercial dishwasher cleaner if hard water is an issue in your area
Loading habits affect cleanliness: Scrape plates before loading, but don’t pre-rinse completely. Modern dishwashers use soil sensors that adjust cycle length based on water clarity. Completely clean dishes can actually result in poorer cleaning performance because the detergent needs something to bind with.
Use the correct amount of detergent for your water hardness. Too much creates excess suds that don’t rinse properly, leaving residue on dishes and interior surfaces. If your water is very hard, consider installing a whole-house water softener or using a rinse aid specifically formulated for hard water.
Address problems early: If dishes come out dirty even though a clean filter and spray arms, the issue may be mechanical. Worn pump seals, a failing heating element, or a malfunctioning control board require professional diagnosis. Home appliance professionals can assess whether repair or replacement makes financial sense based on the unit’s age and condition.
KitchenAid dishwashers typically last 10-13 years with proper maintenance. Regular cleaning is far cheaper than premature replacement and ensures the machine runs efficiently throughout its service life.
Conclusion
A clean dishwasher delivers better results and lasts longer. The 30-minute deep-cleaning process outlined here addresses the most common performance issues: clogged filters, mineral-blocked spray arms, and odor-causing residue. Monthly maintenance keeps these problems from recurring. The supplies are inexpensive, the process is straightforward, and the payoff is consistent cleaning performance for years to come.