Hardwood floors can make a home feel warm and elegant, but over time they collect more than just dust. Grime settles into the grain, old wax builds up in corners, and the finish starts looking dull even after regular sweeping and mopping. A proper deep clean strips away months of buildup and brings back that just-installed glow. It’s not the same as your weekly pass with a damp mop, this is the reset your floors need once or twice a year. Whether the planks are polyurethane-sealed, oil-finished, or waxed, the right approach makes all the difference between refreshed boards and damaged ones.
Table of Contents
ToggleKey Takeaways
- Deep cleaning hardwood floors removes embedded grime, allergens, and product buildup that regular mopping misses, restoring the floor’s finish and extending its lifespan by years.
- Use only pH-neutral hardwood floor cleaners with a barely damp microfiber mop, wrung out thoroughly, to prevent water damage like cupping and warping.
- Mop in the direction of the wood grain in 4×4-foot sections, immediately dry with a lint-free towel, and always scrub edges and corners with a soft-bristle brush for complete buildup removal.
- Most homes benefit from deep cleaning hardwood floors twice yearly (spring and fall), with more frequent cleaning for high-traffic areas, pets, or kids.
- Avoid common mistakes like using too much water, choosing harsh cleaners like vinegar or ammonia, and skipping the rinse bucket—these damage the finish and leave streaks.
- Consider applying a hardwood floor polish after deep cleaning for added shine and protection, but verify your finish type first since waxed floors require paste wax instead.
Why Deep Cleaning Your Hardwood Floors Matters
Regular sweeping and light mopping handle surface dirt, but they don’t touch the layers of residue that accumulate in the wood grain and finish over time. Cooking oils, pet dander, shoe grit, and cleaning product buildup create a film that dulls the finish and traps allergens. Left unchecked, this layer can actually scratch the polyurethane during everyday foot traffic, wearing down the protective coating faster than normal use would.
Deep cleaning removes that embedded grime without stripping the finish itself. It’s particularly important in high-traffic zones, entryways, kitchens, hallways, where dirt gets ground into the surface. Homes with pets or kids benefit even more, since sticky spills and tracked-in mud don’t always come up with a quick wipe.
Beyond aesthetics, a good deep clean extends the life of the finish. Polyurethane-sealed floors can go years longer between refinishing if they’re properly maintained. That saves you the cost and hassle of sanding and recoating, which typically runs $3–$8 per square foot depending on your region and the condition of the boards. For waxed or oil-finished floors, deep cleaning preps the surface for a fresh coat, which is how those finishes stay protected.
If the floor starts to look hazy even after mopping, or if water beads instead of slightly absorbing, it’s time for a deep clean. Those are signs of buildup or a compromised finish.
What You’ll Need for Deep Cleaning Hardwood Floors
Gather everything before starting, stopping mid-job to hunt for supplies is how mistakes happen.
Materials:
- pH-neutral hardwood floor cleaner (avoid ammonia, vinegar, or all-purpose cleaners: they can cloud the finish)
- Microfiber mop with a removable, machine-washable head
- Two buckets (one for cleaning solution, one for rinse water)
- Soft-bristle brush or old toothbrush for grout lines and edges
- Clean, lint-free towels or a dry microfiber mop for buffing
- Wood floor polish or restorer (optional, for an extra shine after cleaning)
Tools:
- Vacuum with a hard-floor attachment (or a broom, though a vacuum picks up more fine dust)
- Spray bottle for spot treatments
- Knee pads if working on hands and knees for stubborn spots
PPE:
- Rubber gloves to protect hands from prolonged water exposure
- Knee pads (optional but useful for spot-scrubbing)
Most DIYers already have a vacuum and buckets. The pH-neutral cleaner is the one non-negotiable purchase, using dish soap or multipurpose cleaners can leave a residue that attracts more dirt. Cleaning marble floors requires similarly specialized products to avoid etching, but hardwood is more forgiving as long as you avoid harsh alkalines or acids.
Check the finish type before buying any product. Polyurethane-sealed floors (the most common) tolerate water-based cleaners well. Waxed floors need a cleaner that won’t strip the wax, and oil-finished floors often do best with a manufacturer-recommended soap.
Step-by-Step Deep Cleaning Process
Prepare Your Floors for Deep Cleaning
Skip this step and you’ll just be pushing dirt around in muddy circles.
-
Clear the room. Move all furniture, rugs, and floor vents. If a piece is too heavy to move, slide furniture pads underneath and shift it to one side, then clean in sections.
-
Vacuum or sweep thoroughly. Use a vacuum with a hard-floor setting or a microfiber dust mop. Go over the entire surface twice, once in the direction of the boards, once perpendicular. Pay extra attention to baseboards and corners where dust bunnies camp out.
-
Spot-treat stubborn grime. Dried spills, sticky spots, or scuff marks need pre-treatment. Dampen a microfiber cloth with your pH-neutral cleaner and let it sit on the spot for 30 seconds, then gently rub. For heel marks, a soft-bristle brush or pencil eraser often works without chemicals. Avoid steel wool or abrasive pads, they’ll scratch polyurethane.
-
Check for damage. Look for loose boards, gaps, or areas where the finish is worn through to bare wood. Water can seep into these spots and cause warping or staining. If you find bare wood, that section may need refinishing or a professional consult before deep cleaning. This isn’t cosmetic work: it’s protecting the subfloor.
Deep Clean with the Right Solution
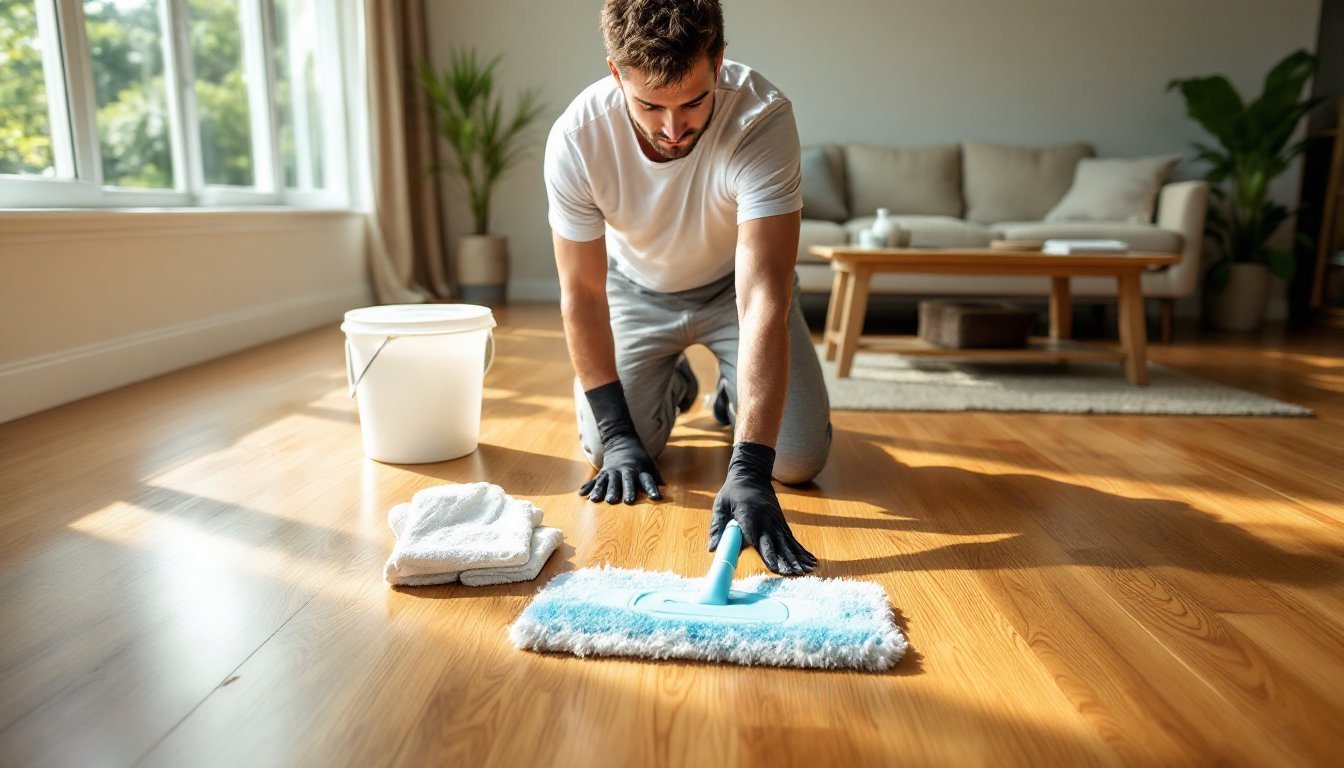
Now the actual cleaning. Most hardwood floor maintenance guides recommend the damp-mop method, just enough moisture to lift dirt without soaking the boards.
-
Mix your cleaning solution. Fill one bucket with warm water and the recommended amount of pH-neutral hardwood cleaner (usually 1–2 ounces per gallon, follow the bottle). Fill the second bucket with plain warm water for rinsing the mop.
-
Wring out the mop thoroughly. Dip the microfiber mop head into the cleaning solution, then wring it until it’s barely damp. The mop should feel damp to the touch but not leave a wet trail. Excess water is the enemy, it can seep between boards, warp planks, or cloud the finish.
-
Mop in the direction of the wood grain. Work in 4×4-foot sections, moving with the boards rather than against them. This prevents streaks and helps the cleaner penetrate the grain evenly. After each section, rinse the mop head in the clean water bucket, wring it out, and dip it back into the cleaning solution.
-
Scrub edges and corners. Use a soft-bristle brush or old toothbrush dipped in the cleaning solution to get along baseboards, under radiators, and around door frames. These spots collect the most buildup and won’t come clean with a mop alone.
-
Dry immediately. Don’t let the floor air-dry. Follow behind yourself with a clean, dry microfiber towel or mop to buff away any remaining moisture. This step is critical for water-sensitive finishes and prevents streaking.
-
Apply a polish or restorer (optional). Once the floor is completely dry, wait at least 30 minutes, consider applying a hardwood floor polish or restorer. These products add a protective layer and enhance shine. Apply with a clean mop or applicator pad, working in thin, even coats. They’re not the same as wax: most are polymer-based and compatible with polyurethane finishes. If your floor is waxed, skip the polymer polish and reapply paste wax instead.
For homes tackling multiple floor types, techniques vary widely, carpet cleaning methods involve extraction and drying time, while tile often tolerates harsher scrubbing.
Common Mistakes to Avoid When Deep Cleaning Hardwood
Even experienced DIYers can wreck a finish with a few wrong moves.
Using too much water. This is the number one error. Hardwood is dimensionally unstable, it expands when wet and contracts when dry. Over-wetting causes cupping (boards curve up at the edges), crowning (boards hump in the middle), or even delamination in engineered planks. If you see standing water, you’ve used too much.
Choosing the wrong cleaner. Vinegar, ammonia, and bleach are all too harsh for hardwood finishes. They can etch polyurethane, strip wax, or leave a cloudy film. All-purpose cleaners often contain surfactants that build up over time. Stick with a pH-neutral product formulated specifically for wood.
Skipping the rinse bucket. Reusing dirty mop water just spreads grime around. As reported by home maintenance experts, rinsing the mop between sections is one of the simplest ways to avoid streaking and residue.
Scrubbing against the grain. This pushes dirt into the seams between boards and can leave visible scratches in the finish. Always mop parallel to the planks.
Ignoring manufacturer guidance. If your floors were installed in the last decade, check for care instructions from the manufacturer, especially for engineered or pre-finished products. Some have specific cleaner recommendations or void warranties if you use the wrong product.
Deep cleaning waxed floors with water-based cleaners. Wax finishes require oil-based or specially formulated wax cleaners. Water-based products can leave white spots or dull the wax. If you’re unsure of your finish type, test in a closet or under a rug first.
How Often Should You Deep Clean Hardwood Floors?
Frequency depends on traffic, household activity, and finish type.
For most homes, deep cleaning twice a year is plenty, once in spring and once in fall. Homes with pets, kids, or high foot traffic may need quarterly deep cleans. If you host frequently or wear shoes indoors, consider every three months.
Between deep cleans, maintain the floor with weekly dry-mopping or vacuuming and damp-mopping as needed (typically every 1–2 weeks). Spot-clean spills immediately, don’t let them sit overnight.
If you’ve applied a floor polish or restorer, it typically lasts 1–3 months depending on traffic. Reapply when the shine starts to fade or after a deep clean.
Waxed floors need a fresh coat of paste wax every 4–6 months, which means deep cleaning (and stripping old wax) on that same schedule. Oil-finished floors often get a maintenance coat of oil annually, preceded by a deep clean to ensure proper adhesion.
Watch for signs it’s time to deep clean: the floor looks dull even after mopping, sticky spots reappear quickly, or water stops beading on the surface. Those indicate buildup or a compromised finish.
Deep cleaning isn’t a substitute for refinishing. If the finish is worn through to bare wood in high-traffic areas, or if scratches are deep enough to catch a fingernail, it’s time to sand and recoat. That’s a bigger project, plan on $3–$8 per square foot and a few days of downtime while the finish cures. Regular deep cleaning can push that timeline back by several years, which is why it’s worth doing right.