A dishwasher is supposed to clean dishes, so it’s easy to assume it cleans itself in the process. It doesn’t. Food particles, grease, mineral deposits, and soap scum build up inside over time, clogging the spray arms, coating the filter, and creating the kind of smell that makes you wonder if something died in there. A deep clean isn’t just about aesthetics, it directly affects how well the machine works. Dishes come out cleaner, cycles run more efficiently, and that funky odor disappears. This guide walks through the complete process, from pulling the filter to running the right cleaning cycles, so the dishwasher actually does its job.
Table of Contents
ToggleKey Takeaways
- Deep cleaning your dishwasher every one to three months improves cleaning performance, prevents odors, and extends the machine’s lifespan by removing buildup that reduces efficiency.
- Start your deep cleaning dishwasher routine by removing and scrubbing the filter, wiping door seals, and inspecting the drain—these components trap the most food debris and odor-causing bacteria.
- Run two consecutive cycles using 2 cups of white vinegar on the top rack followed by 1 cup of baking soda to break down grease, mineral deposits, soap scum, and eliminate persistent smells.
- Regular maintenance between deep cleans—such as rinsing the filter weekly, wiping the door seal, and running an empty vinegar cycle—prevents mold growth and keeps the dishwasher fresh.
- Scrape dishes before loading and avoid overloading to ensure water and detergent circulate properly, reducing buildup and the need for frequent deep cleaning cycles.
Why Deep Cleaning Your Dishwasher Actually Matters
Dishwashers operate in a closed, wet environment where food debris, grease, and detergent residue accumulate. Over time, this buildup clogs the filter, blocks spray arm holes, and coats the interior with a greasy film that prevents water from doing its job.
A dirty dishwasher doesn’t just smell bad, it leaves dishes spotted, streaked, or still greasy after a full cycle. The machine has to work harder to push water through clogged components, which can shorten its lifespan and increase energy usage. In hard water areas, mineral deposits also coat heating elements and internal surfaces, reducing efficiency.
Food particles trapped in the filter or around the door seal start to decompose, creating the sour, musty odor that wafts out every time the door opens. Mold and mildew can also develop in the damp, dark crevices around the gasket and door edges. Regular deep cleaning prevents these issues, keeps the machine running at peak performance, and ensures dishes actually come out clean. Experts recommend a thorough cleaning routine every one to three months depending on usage.
What You’ll Need for a Deep Clean
Gather supplies before starting. Most items are common household products, and nothing requires special tools or expensive cleaners.
Materials:
- White vinegar (2 cups), breaks down grease, mineral deposits, and soap scum
- Baking soda (1 cup), deodorizes and provides gentle abrasive action
- Dish soap (a few drops), for scrubbing the filter and seals
- Soft-bristle brush or old toothbrush, reaches crevices around seals and spray arms
- Microfiber cloths or sponges, wipes down interior surfaces without scratching
- Toothpick or skewer, clears clogged spray arm holes
Optional but helpful:
- Commercial dishwasher cleaner (like Affresh or Finish), convenient alternative to vinegar, formulated to dissolve limescale
- Rubber gloves, keeps hands clean and protected from grime
Avoid using bleach inside a stainless steel dishwasher interior, as it can damage the finish and potentially react with residual detergent. Skip abrasive scouring pads or steel wool, which scratch surfaces and create places for grime to collect.
Step-by-Step Deep Cleaning Process
Work through the dishwasher systematically, starting with the dirtiest components and finishing with a full cleaning cycle. Empty the dishwasher completely before beginning.
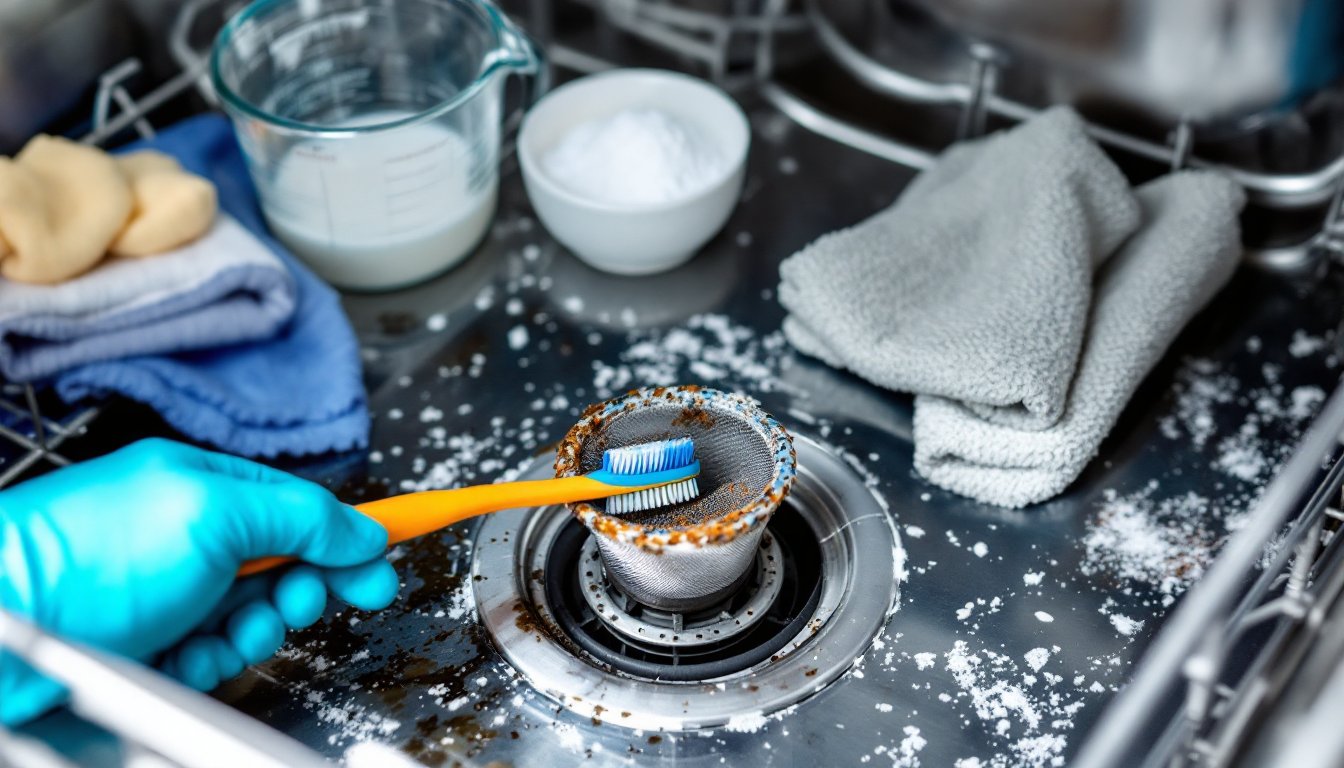
Clean the Filter and Drain
The filter traps food particles to prevent them from recirculating onto dishes or clogging the drain pump. It’s the first place to check when the dishwasher starts smelling or dishes don’t come out clean.
- Locate the filter. It’s typically at the bottom of the tub, beneath the lower spray arm. Consult the owner’s manual if needed, filter designs vary by brand.
- Remove the filter assembly. Most twist and lift out. Some have a cylindrical fine filter inside a coarse outer screen.
- Rinse under hot running water. Use a soft-bristle brush or old toothbrush and a drop of dish soap to scrub away greasy buildup and trapped food particles. Pay attention to the mesh screen, which clogs easily.
- Check the drain area. With the filter removed, inspect the drain opening at the bottom of the tub. Wipe away any standing water, food debris, or slimy residue with a damp cloth or sponge.
- Reinstall the filter. Make sure it locks securely into place. A loose filter can rattle during cycles and won’t catch debris properly.
Some older dishwashers have self-cleaning filters with a built-in grinder, but most modern units use manual filters that require regular cleaning. Check the filter weekly if running the dishwasher daily, or at least monthly for lighter use.
Wipe Down Door Seals and Edges
The rubber gasket around the door and the edges of the tub collect moisture, food splatter, and detergent residue. This is where mold and mildew often develop.
- Inspect the door seal. Open the door fully and examine the rubber gasket running along the inside edge. Look for black spots (mold), slime, or visible grime.
- Wipe with a damp cloth. Use a microfiber cloth or sponge dampened with hot water and a small amount of dish soap. Fold the cloth to reach into the folds of the gasket.
- Scrub stubborn spots. For stuck-on grime or mold, use an old toothbrush dipped in a solution of equal parts water and white vinegar. Avoid harsh chemicals that can degrade the rubber over time.
- Clean the door edges and handle. Wipe down the top edge of the door, the sides, and the exterior handle. Grease and fingerprints build up here, especially on stainless steel finishes.
- Dry thoroughly. Wipe the seal and edges dry with a clean cloth to prevent moisture from sitting and encouraging mold growth.
Check the gasket for cracks, tears, or signs of wear while cleaning. A damaged seal can leak water during cycles and should be replaced.
Run a Vinegar and Baking Soda Cycle
Once the filter, drain, and seals are clean, run two back-to-back cycles to deep clean the interior, spray arms, and internal plumbing.
Vinegar cycle:
- Place a dishwasher-safe bowl or measuring cup filled with 2 cups of white vinegar on the top rack. Use the top rack so the vinegar doesn’t immediately drain during the cycle.
- Run a hot water cycle. Select the hottest, longest cycle available (often labeled “heavy” or “sanitize”). Skip the detergent, vinegar is the cleaning agent.
- Let the vinegar work. As the cycle runs, vinegar disperses throughout the machine, breaking down grease, soap scum, mineral deposits, and odor-causing bacteria. The acidity also helps dissolve limescale in hard water areas.
Baking soda cycle:
- After the vinegar cycle finishes, sprinkle 1 cup of baking soda across the bottom of the empty tub.
- Run a short hot water cycle. A rinse or quick-wash setting works fine. This step deodorizes, brightens stainless steel surfaces, and provides a gentle scrubbing action to lift any remaining residue.
- Inspect the spray arms. If water pressure seems weak or dishes aren’t getting clean, remove the spray arms (they usually twist or snap off) and check the spray holes for clogs. Use a toothpick or skewer to clear any blockages, then rinse under running water before reinstalling.
Alternative: Commercial dishwasher cleaners like Affresh or Finish can replace the vinegar cycle. Follow package instructions, most involve placing a tablet in the detergent dispenser and running a hot cycle. These products are formulated to tackle tough limescale and are convenient, though vinegar is cheaper and works well for routine deep cleaning.
Kitchen appliances benefit from regular maintenance, and dishwashers are no exception. Many home organization resources, including guides on kitchen upkeep, emphasize the importance of appliance care for a functional cooking space.
How Often Should You Deep Clean Your Dishwasher?
Frequency depends on how often the dishwasher runs and local water hardness. As a baseline, deep clean every one to three months for most households.
Monthly deep cleaning is recommended if:
- The dishwasher runs daily or multiple times per day
- The household has hard water (mineral buildup accelerates)
- Dishes go in heavily soiled or with dried-on food
- A foul odor develops quickly between cleanings
Quarterly deep cleaning works for:
- Light use (a few cycles per week)
- Soft water areas with minimal mineral deposits
- Regular filter maintenance and proper loading habits
In between deep cleans, maintain the dishwasher with quick weekly tasks: rinse the filter, wipe down the door seal, and run an empty hot cycle with a cup of vinegar if odors start to develop. Scrape dishes before loading (no need to pre-rinse, but remove large food chunks) and avoid overloading, which prevents water and detergent from reaching all surfaces.
If the dishwasher still smells after a deep clean, or if water pools at the bottom after cycles, there may be a clog in the drain hose or a failing drain pump. At that point, consult the owner’s manual or call a service technician. Some issues go beyond DIY cleaning and require professional repair.
Housekeeping experts often recommend seasonal deep cleaning schedules for various home systems. For those interested in comprehensive home care routines, seasonal cleaning checklists can help organize maintenance tasks throughout the year.